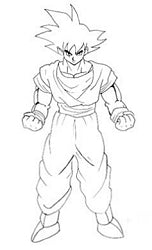
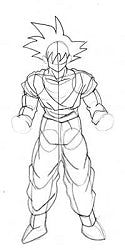
We'll begin with a basic, Dragon Ball-ish pose, and then work our way up to more complicated poses. Start off with the head, torso, and waist. The head is the same shape as in my other DBZ tutorials, just a circle with the lower half of the face added. If you like, you can draw the face first. The only reason that I didn't draw the face first here is because I didn't want to retrace the face that many times. ^_^
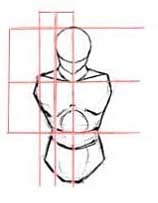
The torso is usually relatively large, and wider than the waist. As shown in this picture, the distance from the top of the head to the bottom of the neck is the same as the distance between the bottom of the neck and the bottom of the torso. Also, the distance from the center of the head to the edge of the head is about the same as the distance from the edge of the head to the tip of the shoulder. Hopefully that will help you get the proportions right. I usually add extremely basic muscle definition, just to get a more three-dimensional look and help with the placement of the other forms. Make sure you draw all this very lightly, because you'll be erasing it and drawing over it later.
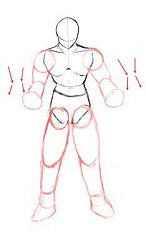
In this picture, the arms don't go straight down. The elbows are pulled back behind him, so that his forearms are level with his waist. Thus, the arms will not be drawn as long as if they were hanging limply at his side. Foreshortening the arms isn't all that difficult, if you think of them just as cylinders. Notice here that with both arms, the top part of the arm slants inward, since it is moving away from you. The lower part slants back out, since his fists are coming towards you. These angles are further exaggerated by the little arrows on the sides of his arms.
DBZ legs tend to be short and stumpy and don't really taper down as much as other characters' legs. Just be careful not to make them too short, or they will look weird. ^_^
The way Dragon Ball Z muscles are drawn reminds of a normally proportioned person with flesh-colored water balloons stuck to his arms. ^_~ The muscles are always very big and round, and are shaded to look like they protrude a great deal, like balloons. This is more prominent in Super Saiyajin characters. The point of this is that it might help you to think of the muscles as individual ellipsoids when drawing them. ^_^