


Most of us started drawing when we were young. Back then, materials and tools were not that important to us. Perhaps, they weren’t even considered. A standard pencil on some notebook paper would often “do the trick”.
But as we grew and developed as artists, the materials and tools that we chose became more important. The connection between quality art materials and quality artwork becomes noticeable along the way and it’s no wonder that emerging artists desire to have the very best materials possible.
If you are starting to get serious about your artwork, no matter what age, you may also be starting to get serious about the materials that you use.
In this post, I’ll offer 10 essential drawing materials and tools for artists that are just starting to get serious about their drawing. (This list is focused on black and white media only)
1. Quality Drawing Pencils
We’ll start off with the most obvious essential – quality drawing pencils. When it comes to drawing pencils, each artist will find a brand that they connect with. There’s no way to know which brand will become your favorite until you try a few.Drawing Pencil Sets

Pencil sets usually come packaged in nice tins and can be great because they often include the full spectrum of graphite grades. Many sets include pencils with harder graphite (9H) through softer graphite (6B). Harder graphite makes lighter marks and keeps a sharp tip longer, while softer graphite makes a darker mark, but needs constant resharpening. These sets give the artist the ability to work with many different values and varieties of mark.
Individual Pencils
Many artists will find that they don’t use all of the pencils in a drawing pencil set. Instead, they may find that they only use a few of the pencils. For example, 2H, HB, 2B, and 4B pencils would be plenty of range for most of us. If this is the case, then a pencil set would not make sense. Instead, purchasing the individual pencils as they are needed is a more logical approach.
2. A Sketchbook

A sketchbook is one of the most important things an artist can have. I should point out that I am referring to an “active sketchbook” – one that receives attention on a daily basis. Anyone can “own” a book with blank pages of drawing paper. But the one that actively gets drawn in on a daily basis is the one of value.
Let me make an analogy to a sketchbook’s importance. Let’s compare a professional athlete’s life to that of an artist’s.
The professional athlete may workout for hours daily in the gym or on the track to enhance their performance on “game day”. Though the world may never see the hours of hard work that have been put into the workout, the exercise is important – if not crucial to the athlete’s success.
An active sketchbook is the artist’s “exercise”. It is the “hard work” that goes into the development of the artist and it is the breeding ground for innovative, artistic ideas. Though the sketchbook may never be seen by the world, it is the often driving factor in successful artworks and successful artists.
3. Quality Drawing Surfaces
A drawing can be made on any surface, but the quality of that surface is sometimes just as important as the medium that it is used upon it.There are a few considerations for choosing a drawing surface that will affect the finished result.
1. The “Tooth” – The “tooth” of the surface is the texture of the paper. The texture of the paper plays a role in how the drawing material is accepted on the surface. Heavier textures will produces lines that may appear “broken”, while smoother textures will produce smoother lines and gradations of value. Some artists will prefer heavier textures while others will prefer a smoother surface.
2. Paper Weight – The weight of the paper refers to how much a ream (500 sheets) of that paper weighs. For most papers, the weight of the paper will be directly related to the thickness of the paper. ( It should be noted that some papers may have a heavier weight but actually be thinner.) For example, 80 lb. paper will typically be thicker than 60 lb. paper, while 100 lb. paper will be heavier than 80 lb. paper.
3. Acid Free – Paper that is “acid free”, without going into all of the technical details, will stand “the test of time”. This paper is will not yellow over time and is more resistant to fading that can occur when exposed to UV light.
Here are few recommended papers that you might experiment with…
Drawing Paper
Charcoal paper
Bristol Paper
4. Variety of Erasers
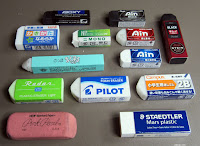
Here are a few recommended erasers…
Rubber Eraser – Your standard eraser for erasing graphite. This eraser uses friction to remove any material from the surface.
Kneaded Eraser – This eraser lifts material from the surface, instead of using friction to remove it. It can be pulled and fashioned into different forms to create specific marks. This eraser gets dirty over time, but can be cleaned by pulling and “kneading” it.
Gum Eraser – “The Crumbler”. This eraser is great for removing media from surfaces that are sensitive to tearing. A gum eraser removes the medium through friction, but crumbles as it does so – preserving the surface.
Vinyl or Plastic Erasers – This eraser is the toughest of the bunch. It can erase almost anything. But be warned – this eraser can tear the paper if you’re not careful.
5. A Good Pencil Sharpener
Pencils need to be sharpened with a quality pencil sharpener. Use a poor quality sharpener and you could be out of a pencil in a matter of moments.Pencil sharpeners generally fall into two categories – Manual and electric.
Electric Pencil Sharpeners

Electric pencil sharpeners can vary in price and the old saying, “you get what you pay for” is true for what you get here.
A quality electric pencil sharpener will sharpen your pencil without eating it all up.
Electric pencil sharpeners are nice to have for a quick sharpen of the pencil, but should not be used with colored pencils. The waxy binder found in colored pencils can build up within the blades of the sharpener, ruining the device.
An Extreme Solution
I’ve had the pleasure of working with the X-Acto Commercial
Manual Pencil Sharpeners
While an electric pencil sharpener has its appeal, a manual pencil sharpener will do for most of us.
Like electric pencil sharpeners, the manual varieties come in different forms. My favorite is a simple, handheld metal sharpener. It’s a cheap and easy solution that is portable and easily replaced.
6. Charcoal or Conté

Charcoal provides a broader range of value and mark-making than what’s possible with graphite. The manner in which marks are made is different as well.
Charcoal comes in both stick and pencil form. Sticks of charcoal are usually either “vine” or “compressed”. Vine charcoal is softer and produces lighter marks, while compressed charcoal – which is concentrated, produces darker marks.
Charcoal pencils can be sharpened like graphite pencils, making them great for details.
Conté is similar to charcoal in richness of color – however the makeup of the material is different. Charcoal is burnt organic material, while conté is made of clay constituents.
7. A Felt Tip Pen

I absolutely love felt tip pens. Felt tip pens allow the artist to create a variety of marks. The tip of the pen allows the artist to create a broad range of line quality.
An added benefit to a felt tip pen is the psychological effect that it can have on the artist.
Using a medium that cannot be erased forces the artist to be more deliberate with their marks. As a result, a bit more thought is put into the marks that are made. You can actually improve your drawing skill by using a felt tip pen.
8. Blending Stumps / Tortillions

Blending stumps also allow the artist to create gradations and smooth applications of value in areas of detail that may be hard to get to otherwise.
You can learn more about using blending stumps and blending tortillions in drawings here.
9. Artwork Storage

Your artwork is important. Even those works that you’d rather not let anyone else see are important. They need to be treated with respect and stored in manner that will keep them preserved and protected.
There are more than a few options for storing artwork, but the most popular option is a portfolio.
There are many different portfolio options out there on the market – each with their own benefits and drawbacks. If you are looking to add a portfolio to your collection, I would suggest looking for a couple features.
1. Rigidness – Look for a portfolio that will keep your artwork from bending. Most portfolios will do this, but there are a few cheaper versions that may not. Look for a portfolio that has a rigid support system.
2. Size – When purchasing a portfolio to store your work, be sure that you provide yourself some room for larger works. Don’t just purchase the 18″ by 24″ portfolio because all of your works up to this point are smaller than this size. Chances are good that you’ll produce drawings that are larger in the future and you’ll wish you would have opted for a larger sized option.
You don’t have to buy a portfolio when you can build your own. With a couple of rigid pieces of cardboard and tape, a portfolio can be created fairly quickly.
10. Art Material Storage

Finding a suitable storage solution is easy. Let me offer three different solutions for three different situations.
1. The Portable Container – When I was an art student in college, I carried around a tackle box filled with my art materials. No manufacturers had tapped into the demand for portable art storage containers back then, so we were all forced to carry around theses modified tackle boxes. They did the trick.
These days, there are plenty of portable solutions that are fortunately designed for artists. Many of these feature stackable trays and levels and are long and deep enough to accommodate brushes and other important tools.
2. The Semi-Portable Container – Larger varieties of the portable option exist as well. I call these “semi-portable” because while you can lug them around – they are really too large for daily use. But, they can provide exceptional organization for your art supplies and tools.
3. The Permanent Stack - If the need doesn’t exist to be carrying your art materials all over the place, then a more permanent solution might be the best option for you.
I’ve already posted on art material storage and the solutions that I use over here. You can check that out to learn more about what solutions may work for you as well.


