Showing posts with label How to Draw. Show all posts

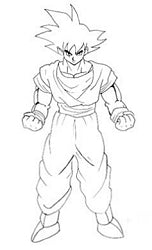
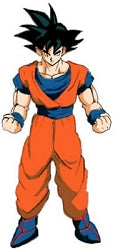
How to Draw Dragon Ball Z (SUPER SAIYA)

Kanji de Manga Vol 3 cover image
Our next pose is similar to the last one, but now one of the legs is foreshortened in addition to the arms, and the upper half of the left arm isn't visible at all since its hidden behind the torso. Start again with the head, torso and waist at a 3/4 view, but now tilt the forms so that it looks like he is leaning over. When a character leans over, you'll notice that the back of the ribcage is large enough that it begins to surround the head. There is a better example of this further on, but I'll get to that in a moment. For now, just take note that the neck isn't going to be as visible when the character is leaning foward, since the head blocks the lower part of the neck, and swell of the muscles on the back hide the upper part of the neck.
Next, draw the arms and legs. You will foreshorten the legs the exact same way as you did the arms; if the forms are moving away from you, slant them inward; if they are moving towards you, slant them outwards. Make the right leg a little short, since it is bent slightly forward towards you (look at the other pictures to see what I mean).


Kanji de Manga Vol 3 cover image
Now you can start adding the details, like the hair, clothing, muscles and hands. Since his legs are bent, there are going to be a lot more folds on the pants. Just remember to draw the folds in the direction that the cloth is being pulled. If you look at the left leg, you'll see that the material is stretched across his knees, so there are horizontal folds near the waist.
Draw the face and the rest of the details, then erase all the unncessary lines and smooth over the finished outline.


Kanji de Manga Vol 3 cover image
You can now color or shade your picture. Nothing much else to say for this particular pose... ^_^;

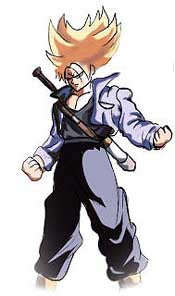
How to Draw Dragon Ball Z (TRUNK)

Kanji de Manga Vol 3 cover image
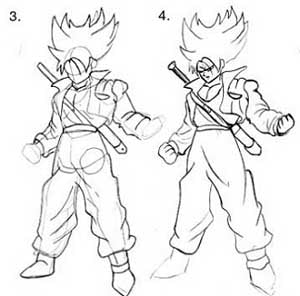
Now let's try a similar pose, except from a 3/4 view. I'm going to move a little faster this time. Draw the same head, torso, and waist as before, except now turn it a 3/4 angle. Use the center line that runs from the top of his head to the bottom of his waist to guide you. Notice that it should follow the contours of the forms rather than moving straight down in a straight curve. Also notice that the back is arched slightly (indicated by the red line). The same proportions as in the tutorial above should apply, but it will be harder to judge since the forms are at an angle.
Once the main body is positioned, draw in the arms and legs. Again, in this pose the elbows have been pulled back and are foreshortened. For the right arm, the upper section slants inward since it moves away from you, and the lower section slants outward since it moves towards you. For the left arm, both sections are moving away from you, so they both slant inward (make sure the lower half is at an angle from the top half, since his arm is bent, not straight. The legs in this picture are more tapered than in the last drawing, so make them a little thinner near the bottom (but not too thin).


Kanji de Manga Vol 3 cover image
Lightly draw the outlines of the clothing, hair, and any accesories (like the sword). Like other DBZ characters, his pants are very baggy and should gather around the ankles. His shirt is sort of tight and shouldn't look too baggy (in other words, don't have it hang down over the belt and bunch up too much), while his jacket is very thick (the material should look loose and bunch up around his joints).
Erase all unncessary lines and smooth out your final outline. Draw in his hands and face.


Kanji de Manga Vol 3 cover image
You can now take your finished picture and color or shade it however you choose. As always, I used Adobe Photoshop, but you can use whatever you want, as long it is shaded and has some depth to it. Notice that since the pants are so dark, you can hardly see the wrinkle lines that were drawn in earlier; instead, the highlights define the shape.

How to Draw Dragon Ball Z (GOKU)


Kanji de Manga Vol 3 cover image
In these tutorials, I will go over how to draw Dragon Ball Z-style bodies. You should be able to use a lot of the stuff here for drawing the bodies of other styles of characters, too. I didn't make up these poses, I took them directly from other DBZ pictures, so you may recognize a few of the more common ones. ^_^
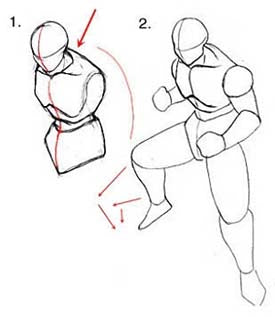
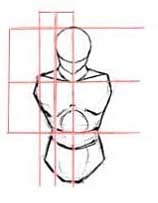
We'll begin with a basic, Dragon Ball-ish pose, and then work our way up to more complicated poses. Start off with the head, torso, and waist. The head is the same shape as in my other DBZ tutorials, just a circle with the lower half of the face added. If you like, you can draw the face first. The only reason that I didn't draw the face first here is because I didn't want to retrace the face that many times. ^_^
The torso is usually relatively large, and wider than the waist. As shown in this picture, the distance from the top of the head to the bottom of the neck is the same as the distance between the bottom of the neck and the bottom of the torso. Also, the distance from the center of the head to the edge of the head is about the same as the distance from the edge of the head to the tip of the shoulder. Hopefully that will help you get the proportions right. I usually add extremely basic muscle definition, just to get a more three-dimensional look and help with the placement of the other forms. Make sure you draw all this very lightly, because you'll be erasing it and drawing over it later.


Kanji de Manga Vol 3 cover image
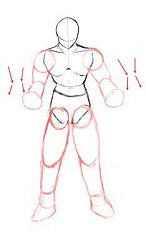
Next, sketch in the basic shape of the arms and legs. Don't worry about the muscles or clothes yet, we'll add those later. Right now, just use sketchy ovals, circles, and cylinders to get the proportions. Use cylinders for the arms, ovals for the legs, and circles for the shoulders, joints and hands. This method may seem awkward at first, but it is a great help in determing the proper length and size of the various parts of the body.
In this picture, the arms don't go straight down. The elbows are pulled back behind him, so that his forearms are level with his waist. Thus, the arms will not be drawn as long as if they were hanging limply at his side. Foreshortening the arms isn't all that difficult, if you think of them just as cylinders. Notice here that with both arms, the top part of the arm slants inward, since it is moving away from you. The lower part slants back out, since his fists are coming towards you. These angles are further exaggerated by the little arrows on the sides of his arms.
DBZ legs tend to be short and stumpy and don't really taper down as much as other characters' legs. Just be careful not to make them too short, or they will look weird. ^_^


Kanji de Manga Vol 3 cover image
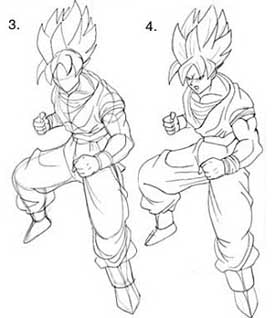
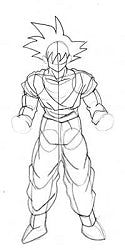
Once the arms and legs are in place, you can begin drawing the details over your rough sketch, such as clothing, hair, and muscles. Folds in clothing can be difficult, but just try to see which way the cloth is being pulled. For example, his pants are very loose and baggy, so it bunches up around his knees and ankles; the folds curve inward and down towards his feet. The material of his belt is stretched around his waist, so the folds are more horizontal.
The way Dragon Ball Z muscles are drawn reminds of a normally proportioned person with flesh-colored water balloons stuck to his arms. ^_~ The muscles are always very big and round, and are shaded to look like they protrude a great deal, like balloons. This is more prominent in Super Saiyajin characters. The point of this is that it might help you to think of the muscles as individual ellipsoids when drawing them. ^_^


Kanji de Manga Vol 3 cover image
Erase all the unncessary lines, leaving only the outline. Add the face and hands, as well as extra details on the muscles and clothes. Clean up your sketch as best as you can.


Kanji de Manga Vol 3 cover image
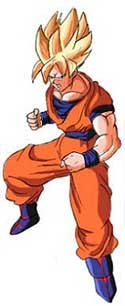
You may now color or shade your picture with a meduim of your choice. Make sure to make the muscles look very round, and make the shadows on the clothes very dark and contrasting.

How to Draw the Death Note Notebook

Death Note

 STEP 1.

Let's start first by drawing the front cover of the notebook. This is pretty simple, just draw an image like the one you see here in this first step.
how to draw the death note notebook step 2

STEP 2.

You will now add a couple pages inside the notebook to give it thickness.
how to draw the death note notebook step 3

STEP 3.

Next up, begin drawing the words 'Death Note' starting with the D and E. Notice there is a dot in the center of the D.
how to draw the death note notebook step 4

STEP 4.

Lastly, finish the word Death, then draw the word 'Note'. You are all done. You can choose to add some texture detailing to the book or leave it a simple drawing. Oh, if there are mistakes just erase them now.
how to draw the death note notebook step 5

STEP 5.

Color the cover black, and the pages/words white. You are done and have completed this lesson on drawing the Death Note notebook.

Basic Drawing : Shade & Shadow


Shadow example Basics
Shading can be a bit tricky at first but its not as difficult as it seems. The picture to the right shows a light bulb and several geometrical shapes; circle, triangle, cylinder, and a square.

You’ll notice that one side of the shape is light and the other is darkened. All you need to know or keep in mind is just that. What the light doesn’t hit, it is darkened. In this example, all you have to do is picture the light source and the object which is being hit by the light –  which part will the light hit? How far will the light go?

You also have to ask yourself where is the light source coming from? If the light is far above, the shorter the shadow is (try checking out your shadow at noon – 12:00PM) whereas the lower the light, the longer the shadow will become. According to the light source, make your shadow fit accordingly.

Good thing to remember also: what is the shape of the object I’m giving a shadow? Each of the shapes in the picture each have their own unique cast. The triangle has a pointy shadow, the circle has a circular shadow, the cylinder has a rectangular shadow, and the cube has a “L”-like shadow. At a different angle, though, the cube will cast a different shadow shape. For instance, if the light was head-on to one of the flat sides, it will cast a square to rectangular shadow depending on the light source’s height.

With that in mind, you also need to remember: what is the shape of the object the shadow is falling on top of? The current example only has a flat surface on which the shadows fall but in most cases, shadows of – say a character – will fall on rocks or on water, which will look different compared to each other.
Shadow example 2 
Tips to keep in mind:
-The darker the shadow, the brighter the light source.
-As the shadow is drawn further from the object, the lighter it becomes.

Drawing the Shadow
The shadow takes on the shape of the item it comes from. If you look to the example picture to the left, you will see various shapes and their shadows being cast. Notice that to make the shadow, all you have to do is create a triangular shape from the top of the object to the ground and back to to the base of the object. 

The cube is a bit more complicated as there are two and in some cases, three triangles you have to draw when at an angle.

Drawing the shadow on the ground, I drew in dotted lines to indicate the shape of the shadow – which is basically the same shape as the object itself. Again, you’ll notice that the cube does its own unique cast as indicated at the bottom example. It forms an “L” type shadow.

Shading
Shading on an object usually starts midway into the object as shown on the cylinder, cone, triangle, and cube. The circle is also shaded midway but considering that it is round, the shape of the shading also becomes rounded! The result is something quite like an eclipse. Note: Shadows depicted in example image are intentionally drawn entirely dark for tutorial purposes.

Shadow exampleLight Source and Shadow
The shape of the shadow is also affected by the light source. When the light source is from anything but the sun, like a light bulb, the shadow widens the further it is from the object. The sun, meanwhile, casts a “striaight” shadow in that it remains true to the objects shape.

More Than One Light Source
A shadow is made for each light source present in a scene. If you are inside a room, for example, and there are two lights on, you will cast a shadow from each light source. This is shown on the right-most example. 

Notice both of the bulbs are at the same distance and height from the object. This fact causes the shadows from both light bulbs to be the same. When the light sources are from different distances and heights, the light source that is closer to the object gives off the darker shadow.

Looking at the example again, note that the area where the two shadows meet is darker than the one shadow itself. Dark + Dark = Darker. Keep this in mind when drawing groups of people who’s shadows happen to overlap and intersect each other.

Summary
Those basic shapes I have mentioned in the previous pages makes up the human anatomy. The circle, rectangle, triangle, cylinder, and square. The arms are basically cylinders, the head is an oval on top of a cylinder, etc. From there, the shadow is based on those shapes. Of course it’s a bit more complicated since the face isn’t all one shape but a combination.

Basic Drawing : Manga Style


If you’re here to learn how to draw or improve your drawing skills – you’ve come to the right place! Almost everything you need to know will be posted here from basic shading to publishing your work. Of course, how far you get will all depend on you!
A few things you should know about this place first…

1. The tutorials here are meant to help you draw your own original work. There are no how-to’s on specific characters. No how-to-draw Sailor Moon, no Kenshin, no Dragon Ball Z, none! Don’t bother emailing me about it either – I’ll tell you the same thing, and you’ll just be wasting my time and yours.

2. All skill levels are welcome to check out the tutorials. Bashing other people for being a beginner or “can’t draw well” will not be tolerated. Funny thing is, most of the beginner’s have the guts to actually submit their work to the Gallery here than more advanced drawers. That says something there, don’t you think?

3. I do not critique art work. Sorry folks but due to all my other projects on this site, it’s pretty much keeping me busy. There is a site which does critiques only: The Art Corner. Go check them out! If you prefer, you can also visit our forum and get feedback that way. Be sure to sign up first if you haven’t already.

4. These instructions are not the only way to draw things. If you are comfortable with another way of drawing, than you should stick with it, develop your own style, and learn what you can with what I have up.

5. I do not get paid to suggest any products or other sites that sell products. They get mentioned because they a) have good products, b) shows an example of something I’m talking about, or c) have useful info.

The only sort of payment I get is orders to Amazon.com in the Shop section and ads which helps pay for running this site plus holding the contest (which I hope to hold at least once a year).

All that done and over with – here is a brief guide to some of the more popular terms and styles of Manga:
 
SHOUNEN — Boy’s manga, usually action/adventure, are aimed at boys 8-18 years old. It is by far the most popular style, and is usually characterized by big battle scenes. Manga such as Dragon Ball Z, Yu-Gi-Oh!, Bleach, and Naruto fall into this category.
SHOUNEN : Dragon Ball Z
SHOUJO — Girls’ manga are usually story-driven, less action-oriented, and romantic. The second most popular format of manga, it is rapidly becoming a very major part of American manga sales. Titles such as Skip Beat, Nana, and Vampire Knight are among the most popular titles. Shoujo style manga is usually geared toward female readers ages 12-18.
SHOUJO : Skip Beat
SEINEN — Seinen manga are series aimed at male readers ages 18-30. While a variation on the Shounen style comics, Seinen series contain more graphic violence and adult situations. AKIRA and  is a very good example of Seinen manga.
SEINEN : AKIRA
JOSEI — Womens comics aimed at young working women and housewives from ages 21-30. The Manga equivalent of Soap Opera’s. Nodame Cantible is one such example from this genre.
JOSEI : Nodame Cantible
HENTAI — Literally “pervert” manga. Hentai refers to pornographic comics and cartoons. Think any X-rated movie.
HENTAI
JIDAIGEKI — Historical manga, usually action-packed, and battle-oriented. Lone Wolf and Cub, and Rurouni Kenshin are some Jidaigeki.
JIDAIGEKI : Lone Wolf and Cub

MECHA — Mecha manga refers to the “Giant Robot” stories such as Gundam, Voltron, and Big O. They are usually action-oriented with big fights, lots of explosions, and tend to have some kind of “save the world” angle.
MECHA : Gundam
BISHOUJO — A very popular manga style, full of cute girls and/or funny animals. Series that fall under this category are Hamtaro, and Hello Kitty.
BISHOUJO : Hamtaro
BISHONEN — “Beautiful boy” stories — aimed at teenage girls, and featuring very pretty, almost effeminate looking heroes. Series that fall into this category include Peach Girl, and X/1999 by CLAMP.
BISHONEN : Peach Girl
A few subcategories of the above types are:
SHOUJO-AI — Literally means “girl’s love” and covers female-female relationships, usually on a romantical level (aka Yuri).

SHONEN-AI — Literally means “boy’s love”, with story covering male-male relationships, usually on a romantical level (aka Yaoi).

KODOMO — children’s manga, aimed at 6-10 year olds, an offshoot of Bishoujo, shounen, or shoujo styles. Kodomo manga include Pokemon and Digimon.

There are a lot more subcategories under each section such as harem, sports, cooking, and magical girls but the main ones are listed above. For more terms, visit Wikipedia or read one of the many books that talk about manga such as Frederik Schodt’s Manga! Manga! and Dreamland Japan.


Hello World !!! : How to Draw Anime