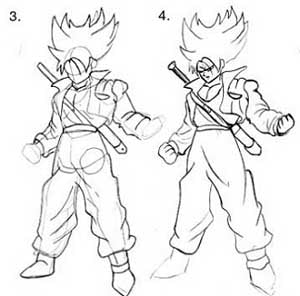
Now let's try a similar pose, except from a 3/4 view. I'm going to
move a little faster this time. Draw the same head, torso, and waist as
before, except now turn it a 3/4 angle. Use the center line that runs
from the top of his head to the bottom of his waist to guide you. Notice
that it should follow the contours of the forms rather than moving
straight down in a straight curve. Also notice that the back is arched
slightly (indicated by the red line). The same proportions as in the
tutorial above should apply, but it will be harder to judge since the
forms are at an angle.
Once the main body is positioned, draw in the arms and legs. Again,
in this pose the elbows have been pulled back and are foreshortened. For
the right arm, the upper section slants inward since it moves away from
you, and the lower section slants outward since it moves towards you.
For the left arm, both sections are moving away from you, so they both
slant inward (make sure the lower half is at an angle from the top half,
since his arm is bent, not straight. The legs in this picture are more
tapered than in the last drawing, so make them a little thinner near the
bottom (but not too thin).

Lightly draw the outlines of the clothing, hair, and any accesories
(like the sword). Like other DBZ characters, his pants are very baggy
and should gather around the ankles. His shirt is sort of tight and
shouldn't look too baggy (in other words, don't have it hang down over
the belt and bunch up too much), while his jacket is very thick (the
material should look loose and bunch up around his joints).
Erase all unncessary lines and smooth out your final outline. Draw in his hands and face.

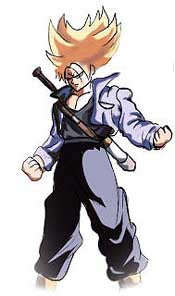
You can now take your finished picture and color or shade it however
you choose. As always, I used Adobe Photoshop, but you can use whatever
you want, as long it is shaded and has some depth to it. Notice that
since the pants are so dark, you can hardly see the wrinkle lines that
were drawn in earlier; instead, the highlights define the shape.


